Saturday, October 1, 2011

Avid Baker's Challenge: Cupid's Strawberry Cake with Cream Cheese Buttercream

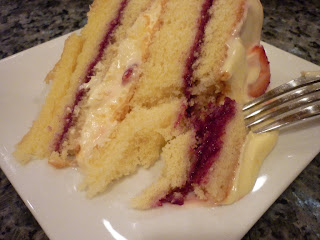
The second Avid Baker's Challenge September cake is Cupid's Strawberry Cake with Cream Cheese Buttercream on page 314 of Flo Braker's Baking for All Occasions. I actually made this cake a few months ago for a party but saved the photos for this month. This is going to be a quick post with just the pictures as I'm so overdue in getting this posted.

I made the cake on a hot and humid June day so the cream cheese buttercream frosting didn't participate too well - even after chilling in the fridge. However, this is partly my fault because I refuse to use gelatin, so I'm sure it would have set up better with the called-for gelatin. In the end though, the super soft buttercream didn't really matter because the overall cake was absolutely delicious! I made the cake for a wine and cheese party (aka my bookclub) along with the HCB Mud Turtle Cupcakes and both were a hit. I loved the yellow cake - moist and light but sturdy - perfect for filling with jam. And the other flavors - the cream cheese frosting with a hint of lemon, jam and strawberries - all went together really well. Another hit from Flo!

mise en place for the cake

creaming the butter and sugar until very pale

in go the eggs then the rest of the ingredients

into the oven

out of the oven...golden brown

mise en place for the buttercream

cream cheese and butter, whipped

whipping the egg yolks

water-sugar mixture is boiled to soft-ball stage and added, then whipped some more

the cream cheese mixture is added

fresh strawberries and jam

ready to slice - with my new 18" long cake knife - and assemble

first layer, sliced in half, waiting for a layer of jam

in the middle of the cake, strawberries get sandwiched  between buttercream

the finished cake

seems a shame to cut it!

but I've got to have a taste...delicious!

Bye for now...

Thursday, September 15, 2011

Homemade Chocolate Sherbet

I bought a new kitchen gadget at the beginning of the summer - an ice cream maker...Fun! I'm kind of addicted to buying kitchen gadgets. My mom bought me my KitchenAid stand mixer about 20 years ago right after college and it still works...I love it so (is it wrong to love an inanimate object?). I love to bake (obviously!) and think that everything is much easier when you have the right equipment. My friend V has an ice cream maker and after hearing of all of her imaginative frozen treats, I had to have one for myself.

The machine itself is super easy to use. You mix up the ingredients (make sure they're cold!) and then pour them into the frozen tub and the machine does the rest in about 20 minutes. After it mixes, you can enjoy it right away as super soft ice cream or put in the freezer to let it firm up a bit. The only real drawback is that you have to have lots of space in the freezer - space for the ice cream maker tub, and space for the container you're going to store the ice cream in (I use a glass container so it makes a huge difference to chill the container first, before adding the ice cream...otherwise it starts to melt right away since the glass is room temp). When it's 85 and humid, it also helps to keep your serving dishes in the freezer. I use ramekins so they are pretty easy to tuck into little nooks in the freezer.

So far I've made David Lebovitz's delicious chocolate sherbet several times. It's very chocolatey and creamy, and since it's only made with whole milk so I can pretend that it's good for me. It's made using both cocoa powder and dark chocolate so it's great for my fellow chocolate lovers out there; you really only need a little to fulfill that chocolate craving. I've also made a coffee and vanilla bean sherbet. While it tasted quite delicious, I left it in the ice cream maker for far to long so it got really icy. After that debacle I make sure to always set a timer. 

Next on the list are some more interesting flavors - grapefruit and honey sorbet sounds delicious! EatingWell has some really interesting sorbet combinations. Yum!

mise en place - so simple!

cocoa powder is melted in 1/2 the milk

the chocolate is melted in and the vanilla, coffee liquor and remaining milk are added

into the ice cream maker

starting to freeze

almost there...

done and dusted. And delicious!


Bye for now...

Thursday, September 8, 2011

British Flapjacks aka Chewy Granola Bars

I belong to a great group called a Time Trade Circle (Timebank). I think it originally started in Chicago, but there are groups all over the country now. It's sort like a bartering circle - a great local group where you can earn hours doing things for people and then you can spend the time you've earned to have people do things for you. But the genius thing is that you don't have to trade hours with the same person. So, for example, I can bake the bars in this post for person A and earn some hours and then spend the hours having person B paint my livingroom.

So far I've made baked goods, given a few manicures and helped someone organize their clutter to earn hours. I've spent my hours having someone do some heavy gardening for me, getting acupuncture, meeting with a nutritionist and even getting some stairs built off my back deck! There are people offering everything from general skills (drive car-less people to the grocery store, internet research) to really specific skills (bellydancing lessons(!), foreign language lessons). It's fantastic to get to meet new people, feel like you're helping your neighbors and then also to get services at no financial expense.

So, anyway, on to my chewy granola bars! This recipe were specifically requested from someone in the timebank but since I'd never made anything like it before I wanted to give them a test run. The recipe (from Bon Appétit) calls them British Flapjacks but to me a flapjack is a pancake, so I've just been calling these oat bars or chewy granola bars, which is what they remind me of. You could also easily add nuts, sunflower seeds, etc. to make them more like a trail bar and would just need to up the butter and golden syrup a little so they are moist enough (otherwise they come really dry and hard).

I'm glad a made a test run recipe because otherwise I never would have discovered that I absolutely LOVE British flapjacks! I've made them several times already over the last six weeks or so and eat them for breakfast, as a snack and even for dessert. They also keep for almost a full week so I bring some to work and leave in my desk for breakfast everyday. Easy!

I've made a couple of changes from the Bon Appétit recipe, so I'll list my ingredients and directions below. The recipe calls for using quick oats (not rolled/old fashioned) but quick oats don't have as much nutritional benefit so now I use a combination of both quick oats and old fashioned oats, I also add some oat bran for some additional fiber. I do like the finished texture of the quick oats better than the old fashioned oats, but I'm trying to be healthier so am opting for the higher fiber option of the mix. The other change I made is that I added cranberries and then switched from cranberries to raisins because the cranberries are sweetened themselves so it can be a little too much (raisins are also cheaper!). I get all four of those items in the bulk department at Whole Foods.

The only hard part, in terms of ingredients, is finding the golden syrup called for in the recipe. Golden syrup is a British syrup made from sugar, so it's not the same as corn syrup (which I believe to be horrible for your body and I try really hard to avoid). I used Lyle's Golden Syrup when I made Sticky Toffee Pudding back in February - so I knew it was sold around here - but for some reason had a harder time finding it than before. I finally found it at the second "regular" grocery store I tried (after not finding it at Whole Foods or Trader Joe's) and bought 6 jars of it...that's how serious I am about loving these oat bars!

A couple of other changes I might make in the future are to bake in a tart ring and then cut into "pie" slices and to add nuts and bake as a crumbled mix on a sheet pan and use as granola (serve as cereal with milk or with yogurt).

You can find the Bon Appétit recipe for British Flapjacks here; my changes are...

Chewy Granola Bars
Ingredients
1/2 cup (1 stick) unsalted butter
1/2 cup packed (light or dark) brown sugar
1/4 cup Lyle's Golden Syrup
Pinch of salt
1 1/3 cups quick-cooking oats (not instant)
2/3 cup old-fashioned oats
1/3 cup oat bran
1/2 cup raisins or dried cranberries

Directions
Preheat oven to 350.

Put a piece of parchment into a square 8x8" pan (fold so it's 8" in one direction but hangs off edges in other direction - see my photo below). The original recipe calls for buttering the pan, but - if you use parchment - I found that it was unnecessary to butter even the non-parchment sides of the pan. You may need to loosen the non-parchment sides with a knife, but the parchment allows you to lift the whole thing right out and onto the cooling rack.

In a saucepan, heat the butter, brown sugar and golden syrup over medium heat until the butter melts. Continue cooking, stirring often, until the sugar melts (look for any granules on the back of a spoon). When sugar is dissolved, remove from heat and add the pinch of salt, stir. Add oats, oat bran and raisins and stir until all the oats are fully coated (a large, heat-resistant spatula helps here).

Scrape the mixture out of the saucepan into your prepared pan and then press firmly into the pan (you want to press hard enough so it stays in bar form once it's cooked). I found that tearing off a strip of parchment, placing that on the mixture and then using my hand was the best way to press it into the pan (especially the corners). Just be careful because it's hot! The mixture is pretty sticky at this point so using the back of a spoon doesn't work very well.

Bake at 350 for 25 minutes - don't overbake or it will start to dry out.

Cool in the pan for 5-10 minutes and then slice into 16 pieces (slice across and down and then slice each of those 4 squares from corner to corner so you end up with 16 small triangles). Let cool another 5-10 minute and then lift out of the pan using the parchment ends and let cool on a rack. Do not wait for it to completely cool before you cut it as it will be too hard when it cools.

Enjoy!

mise en place

melt the butter, brown sugar and golden syrup

add the oats and cranberries, raisins or other additions

spread in the pan

yum!

press into the pan and bake

smells so good

tastes even better!


Bye for now...

Quick Lentil Stew and Focaccia

Last week a work colleague had a lentil salad for lunch - it looked delicious. So delicious that I wanted to try something similar myself. I bought some French lentils (I like them because they cook faster) and threw together a quick lentil stew and some focaccia this weekend.

The focaccia recipe I used was cobbled together from a Julia Child (Baking with Julia) recipe and one from a bread class at Cambridge School of Culinary Arts. The lentil stew recipe I made up on the fly, so I'll list it below. In terms of the ingredients I just threw together what I had around the kitchen and pantry. I called it a stew instead of a soup because I wanted it to be thick hearty rather than brothy but if you prefer more broth you can add more water or stock. I wanted to use stock but didn't have any and worried that the water would make for a bland stew, but it actually was very flavorful so I'm glad I went ahead and made it without waiting to use stock.

Quick & Easy Lentil Stew
Ingredients
French green lentils - I used about 3 cups worth (rinsed and picked over)
1 large onion, chopped (I used a huge vadalia, but I love onions, so use more/less as you like)
5 small carrots, chopped into bite sized pieces
3 cloves garlic, minced
1 can whole tomatoes, chopped
smoked thick cut Canadian bacon cut into bite sized pieces (any other meat you like would work...or no meat!)
olive oil
~5 cups water to cover lentils (more or less depending on how much lentils you use and/or how much broth you want)
salt & freshly ground pepper, to taste
2 bay leaves
~1/2 t oregano
I didn't think of it at the time but some hot sauce might be good to give it a little kick. Frank's Red Hot is my fav.

Directions
Heat olive oil in a large pot, add onions and carrots. Cover and cook for about 5-10 minutes - stirring occasionally - until the onions are translucent and carrots begin to soften. Add garlic, salt and pepper and stir.

Add the remaining ingredients (lentils, tomatoes, Canadian bacon, bay leaves, oregano, water) and give it a good stir. Cook for about 30 minutes - stirring occasionally and adding more water, if neccessary - until the sauce is thickened and the lentils are soft.

Enjoy with some focaccia, crusty french bread or some tortilla chips and a glass of red wine. I've been bringing leftovers to work this week and it's just as delicious!


the finished stew - onions and carrots and lentils, oh my!

into the bowl

yummy!

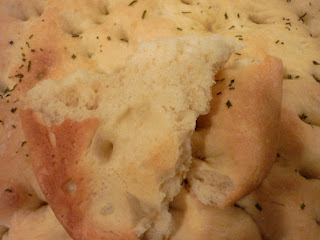
focaccia - brushed with olive oil and sprinkled with salt and chopped rosemary...
ready for baking

smells delicious


Bye for now...

Tuesday, September 6, 2011

Heavenly Cake Baker: German Chocolate Cake (free choice)

heavenlycakeplace This week's Heavenly Cake Baker cake was free choice. I haven't been baking much lately - a combination of it being super hot and humid, having an unusually busy summer and then being on vacation in Montreal (joy!) - so I thought I would choose a cake that my fellow HCBers made while I was away. I chose the German Chocolate Cake from Rose's Heavenly Cakes. I've never made a German Chocolate cake before and this seemed pretty straightforward so I decided to give it a go.

The cake was dead easy to make and had a very unconventional way of mixing. Normally cakes have milk which is added to the creamed butter/sugar/eggs mixture in 3 or 4 parts alternating with flour. This cake has no milk. Instead, it calls for oil and extra egg whites. The eggs are separated and the egg whites are added at the end. Worked like a charm!

I decided to make cupcakes instead of a layer cake and they came out nice and moist. They were chocolaty, without being too chocolaty (which can also be delicious!) and the crumb was light and spongy. The light texture went well with the heavier coconut frosting. The frosting was good, but very thick and sweet and I could taste the evaporated milk quite clearly. On the one hand I thought I might not have cooked it down enough (because of the flavor coming through) but on the other hand I thought I cooked it too long (because it was so thick). I used a flake coconut (instead of shredded) but I think the larger flakes would have worked better on a large cake instead of the cupcakes. Next time I might try part shredded and part large flakes. Or I might just use a buttercream frosting instead. My husband had a plain cupcake with vanilla ice cream on top and declared it delicious!

mise en place for the chocolate cake

the cocoa is melted with boiling water and then the yolks and oil are mixed in...

until it's light, fluffy and almost resembles a buttercream frosting

then the flour is added and you get this thick sticky batter.
Finally the egg whites are added (no photo) and you get a very thin, liquidy batter!

finished cupcakes...light and moist

mise en place for the coconut frosting

evaporated milk, sugar and egg yolks get cooked, then coconut and pecans are added

my husband said: "it looks like pasta"

voila!

delicious


Bye for now...