Saturday, July 28, 2012

4th of July - the dessert table!

We had a small afternoon party to celebrate July 4th. Here are some photos from the dessert table. I made the July ABC, Classic Fruit Tart, for the party. I also made one of my favorite cakes, Golden Lemon Almond Cake, a strawberry-blueberry fruit salad, some watermelon and a delicious fruit platter courtesy of mom.


the stars and stripes

a patriotic watermelon

I like to mix fresh strawberries and blueberries with a sprinkle of sugar,
some vanilla and then add some champagne or a bit of liquor...
chambord (black raspberry), framboise (raspberry) or cointreau (orange)
all work well

so pretty

and delicious!

I made some whipped cream and mixed it with the raspberry sauce

yummy!

time to dig in

juicy watermelon

my mom brought this amazing fruit platter. The pineapple was so juicy and delicious.


Bye for now...

Golden Lemon Almond Cake

I originally made this fabulous Golden Lemon Almond Cake last year and it was so delicious that I've made it about four times since then. The recipe comes from Rose Levy Beranbaum's Rose's Heavenly Cakes and was part of my Heavenly Cake Baker baking ring from 2011. I highly recommend this cookbook. While I joined the HCBers late so didn't make every recipe in the book, the cakes that I did make all turned out beautifully. Plus, the book itself is gorgeous - lots of color photographs, clear directions and helpful hints.

I made the Golden Lemon Almond Cake again for a party we had on July 4th and, once again, it was fantastic.

This cake is so simple to make because you don't have to do the standard alternating dry and wet ingredients. You just mix the dry ingredients together then add the butter and most of the sour cream and mix that together. Finally, you add the remaining wet ingredients and that's it! After the cake is baked you brush on a sweet and tart lemon syrup - so delicious! The cake has a wonderful body - substantial but not heavy or dense and the ground nuts give the cake both its amazing flavor and also keep it really moist.

I made a delicious raspberry sauce (also from the Heavenly Cakes cookbook) to serve with the cake. It would be equally yummy served with a lemon whipped cream or just plain.


mise en place

use a heavy-duty pan with funky edges and your cake will have
gorgeous lines and a golden brown crust

blanched, sliced almonds are toasted to a golden brown and then ground

after the nuts are mostly ground, the lemon zest and part of the sugar are added
and pulsed some more

I could just eat this mixture on its own

the flour mixture, the remaining sugar and nut zest mixture are added
to the bowl of a stand mixture and mixed to combine

the butter and most of the sour cream are added to the dry ingredients and are beaten

the wet ingredients are combined and then added to the dry

more than doubled in volume...it's a gorgeous batter!

in the close up you can see the little bits of ground almonds

ready to be baked

making the syrup...so delicious

done and cooled

so gorgeous and the smell - the lemons and almonds - is amazing

the lemon-sugar syrup gets brushed on what will be the bottom

the turbinado sugar in the syrup give the cake a
sparkly appearance and a sweet crunch

can't wait for the party so I can try a slice

Here is the raspberry sauce I made to serve with the cake. The first time I made this sauce it was also for an HCB cake, Moist Chocolate Raspberry Génoise. This sauce is so incredibly delicious. Sweet, a little tart from the lemon juice and very, very raspberry-ish (is that a word?). I could, literally, just drink it. In fact, it would be delicious in a martini or other cocktail or even just added to some plain soda water. Oh, I am getting so many ideas on how to eat this sauce!

just three ingredients - lemon juice, sugar and frozen raspberries

the raspberries are thawed and the released juices get...

...boiled down to a few tablespoons

the thawed raspberries are then pressed through the strainer (or foodmill)
to collect their "pureed" juices

the finished sauce


Bye for now...

Saturday, July 14, 2012

Cannellini Bean & Caper Crostini

This recipe for Cannellini Bean & Caper Crostini is one of my favorites. You can get the complete recipe from Martha Stewart's website. This recipe is perfect for a party (easy to make ahead the crostini and the topping then assemble last minute) or just serve with a salad for a light lunch. The combination of the beans, capers, onions, olive oil and white wine vinegar is just perfect and the recipe is easily doubled. I highly recommend this one.

If you've never made crostini before, it's very easy - just thinly slice a baguette (a day old baguette works wonderfully), brush both sides lightly with olive oil and sprinkle a little salt and pepper on each slice. Arrange the slices on a sheet pan and bake at 375 until lightly golden/toasted. The crostini is delicious on its own, with a salad, topped with a bit of goat cheese and tomato...or with this Cannellini Bean & Caper mixture!

mise en place: beans, capers, red onion, olive oil, white wine vinegar, salt and pepper - easy!

1/4 of the onion is finely diced and then everything is mixed together

as you mix, crush the beans a little to create a cremier sauce

cooling my freshly made crostini - yum!

I served this at a party and let guests make their own

so delicious!

Bye for now...

Tuesday, July 10, 2012

Homemade pesto

dinnertime...linguine, my homemade pesto and a sprinkle of cheese.

I absolutely love pesto. I love it on pasta (natch), bread, vegetables, fish, even just a plain spoonful. I've been wanting to make it from scratch for a while now since it seems like it should be super easy to make and would take advantage of having lots of fresh basil available in the summer. Plus, I figured it would be even more delicious freshly made. Here is the general recipe I made up, but this is definitely the kind of recipe you can adjust to suit your tastes.

This recipe made a lot of pesto, so when it was done, I split it in half and poured some olive oil over the top so the basil didn't get discolored (pics 13, 14 below). I stored half in the freezer and left the other half in the fridge to eat over the course of a week or so. The frozen pesto should be good for at least 1-2 months...maybe longer but mine never lasts that long! If you don't want to freeze it in one big jar like I did, you can do it in an ice cube tray and then, when frozen, transfer the cubes to a zip bag. 

Homemade Basil Pesto
Ingredients
16 oz fresh basil leaves, about 4 packed cups (I used the 4 oz packs from Happy Valley brand) 
3/4 cup pine nuts
4-5 cloves garlic (I love garlic so used 5 cloves)
2/3 cup grated parmesan cheese (I used a combination of parmesan sarvecchio and parmigiano reggiano. Go for the quality stuff here...nothing out of a green canister!)
1/2 cup olive oil
~ 1/3 teaspoon each salt and pepper (to taste)

Directions
Pick over the basil and discard any brown or old leaves. Wash and dry the basil leaves (pic 7).

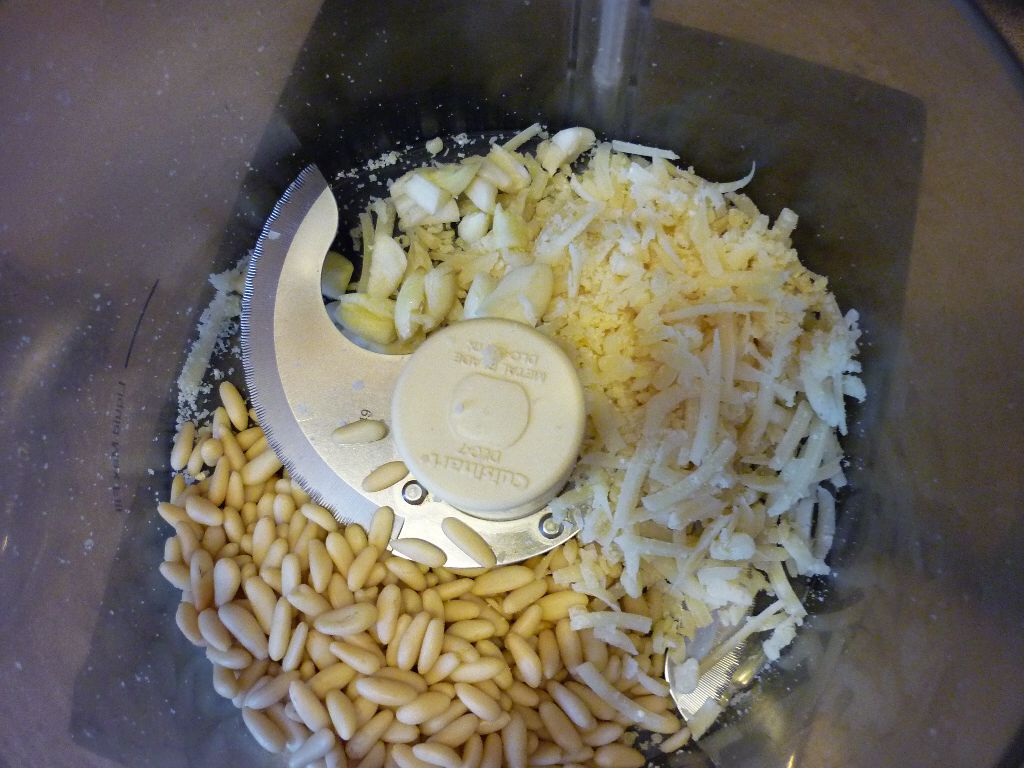
Put the grated parmesan cheese, pine nuts and garlic cloves into the bowl of a food processor and pulse until the mixture resembles bread crumbs (pics 8, 9).

Add the basil leaves and pulse until combined (pics 10, 11). At this stage it will resemble a thick green paste.

With the food processor running, drizzle in the olive oil (you may need slightly less/more than 1/2 cup) until you get the consistency you want. Sprinkle in the salt and pepper and blend again for a few seconds. Voila, fresh homemade petso (pic 12)...how easy was that?!

Stir into pasta, vegetables or a baked potato and enjoy!

mise en place

I used two cheeses - the parmesan sarvecchio was a bit more mild tasting

while the parmigiano reggiano was sharper and "nuttier" tasting

I used my food processor to grate the cheese...took about 12 seconds!

into a separate bowl so I can add the cheese a little at a time, as needed

lots of garlic!

(pic 7) washing and drying the basil leaves

(pic 8) pine nuts, cheese, garlic go into the food processor

(pic 9) I pulsed them together until they resembled bread crumbs

(pic 10) add the basil leaves. I had to do in 2 bunches (add, blend, add the rest) since they were so bulky.

(pic 11) blend until the basil is incorporated

(pic 12) after adding the olive oil. The longer you mix it, the creamier it will get

(pic 13) I split the pesto into 2 jars - one to freeze and one to enjoy now

(pic 14) pour a little olive oil on the top to prevent discoloration

mouth wateringly delicious!

Bye for now...