Another week (the 7th), another recipe from my bake-through adventure with
Rose's Alpha Bakers. Up this week is the
Black & Blueberry Pie, from Rose Levy Beranbaum's
The Baking Bible.
There is something about making pies that I love. I don't know if it's all of the different steps involved or the rolling out of the dough. Or maybe it's the fact that you can combine, basically, flour and butter and a little liquid, fill it with something yummy, and it's transformed in the oven. I guess I should keep making pies until I figure it out!
 |
| gorgeous...pies, pies, pies! |
 |
| time for a slice |
I ended up making more of a blue & blackberry pie (heavier on the blues) because 1) blackberries are super expensive in New England in the dead of winter, and 2) I had 4 cups of frozen blueberries leftover from a huge box of organic Maine wild blueberries that I got delivered with my Boston Organics service last summer. I had a wonderful summer full of blueberries and baked goods full of blueberries, including these amazing
Blueberry Muffins with a Cinnamon Crumb Topping (recipe posted) which I made several times.
 |
| organic wild blueberries, a taste of Maine |
Overall, the pie was very good, especially with vanilla ice cream. I've never made a cream cheese crust before, but it was delicious! It was super flaky and tender. As a whole pie, it looked gorgeous with my "berry" steam holes on the top crust and the little leaf cutouts. My pie filling, however, was way too liquidy! I'm glad I wasn't serving it at a party or it would have been a huge disappointment (although the taste was great, so hopefully no one would have minded). It barely held up taking it out of the pie plate.
I waited the instructed 2-hours before cutting into it, but am guessing that using mostly blueberries and/or frozen berries is probably what made it so liquidy. I probably should have cooked it longer but was worried the top was becoming too brown. The pie was also a bit on the sweet side, which again, is probably because I used more blueberries than blackberries. It would have been nice to have a recipe adjustment for all (or mostly) blueberries and for using frozen berries.
I'm going to pour out the liquidy juice, puree and strain it, and make some sort of cocktail with it...I bet it will be amazing! {update...} Yum, my first
Black & Blueberry Pie Cocktail! I spooned some of the pie juices into one of my 1920s style champagne glasses, topped it up with prosecco and voila...deliciousness!
 |
take a few tablespoons of black & blueberry pie juice and
a couple of blueberries, then add prosecco... |
 |
| ...and YUM! A sparkling, blueberry-flavored drink. |
Here are my pie photos...
 |
| mise en place for the crust |
I prefer to make pie crusts by hand so I used a bowl and the countertop.
First, the dry ingredients are whisked together. Next, the cream cheese is added and, using your fingertips (be sure they're covered in flour the whole time), it's incorporated until it's the size of coarse meal.
 |
| the different stages of the cream cheese incorporation |
After the cream cheese was fully blended, I added the butter, then dumped everything onto the countertop. I used my pastry blender and bench scrapper to incorporate the butter until it was broken down into pea-sized pieces. During this part, I didn't use my hands or their heat would melt the butter which would ruin the flakiness of the final pie crust.
 |
| starting to cut the butter into the pastry |
 |
| nearly there... |
 |
| ...that looks good! |
The liquid ingredients - vodka (which I substituted for cider vinegar) and heavy cream - are drizzled over the dry ingredients.
 |
| adding the cream and vodka |
Then I used my bench scrapper to "cut" the liquid ingredients into the dough. When it was starting to come together, I used my hands to quickly knead it all together (again, don't use your hands too much or the butter will melt).
 |
| cutting in the liquid ingredients |
 |
| starting to knead it all together...nearly there |
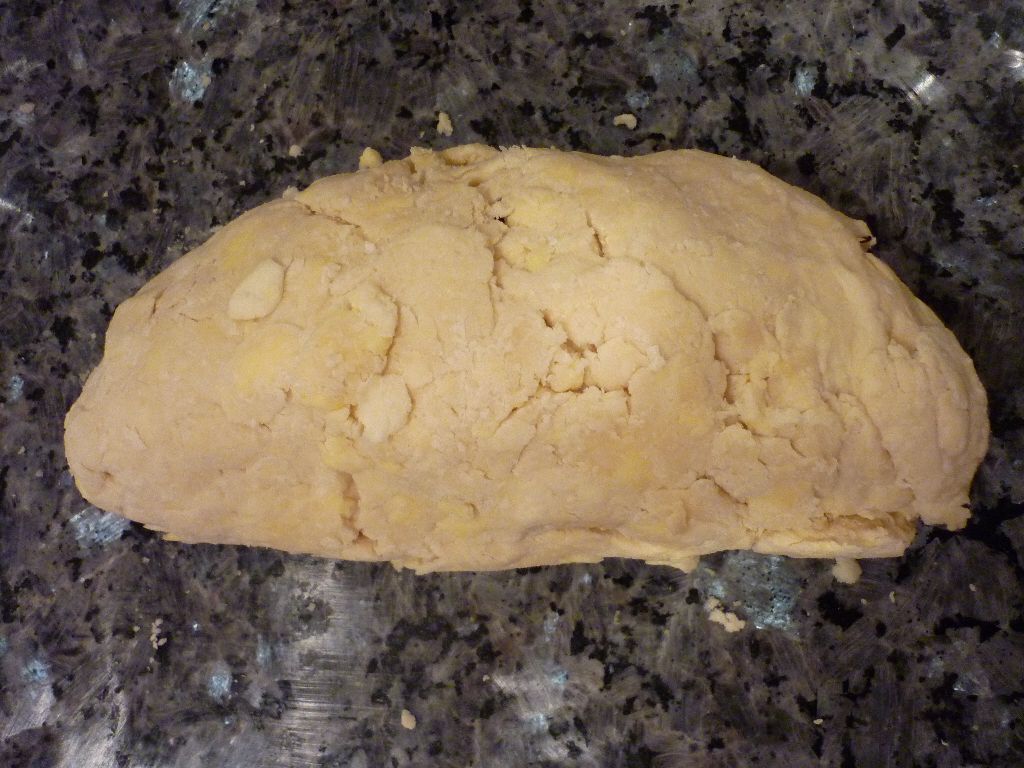
Finally done and the dough has completely come together. The dough is cut into two equal pieces (for the top and bottom crusts), placed between plastic wrap, then refrigerated so the dough can rest. At this point, I like to give it a little bit of a roll before putting in the fridge. I find it's easier to roll this way.
 |
| my top and bottom crusts |
 |
| slightly rolled out, then popped into the fridge to rest |
 |
| after it's rested and chilled, the dough is ready to roll |
 |
| using the top piece of plastic wrap, I eased it into the pie plate |
 |
cleaned up the edges, then back into the fridge to chill while
I make the filling |
 |
| mise en place for the pie filling |
 |
so juicy!
I might just eat these right now...no one would notice, right? |
 |
I love lemon zest! After mixing the dry ingredients,
the zest and then lemon juice are added. |
 |
even though it was only 15 degrees outside, it was a clear, sunny morning
when I made the pie. Here are the berries sitting in the sun. |
 |
the other ingredients were mixed together then the berries added...
stir gently! |
 |
the perfect amount of filling! Rose's recipes are always
perfect in this respect |
I decorated the top crust with leaf cutouts, brushed with heavy cream and then sprinkled with sugar to give it some shine when baked.
 |
| ready to bake...so pretty :) |
 |
all done! Gorgeous. I think this is why I love pies -
so basic in parts, yet so amazing in sum. |
 |
| the juices are bubbling through |
 |
| here is a slice...a bit too juicy and the filling too "loose" for my liking |
I had a bunch of dough scraps so I re-rolled the dough and made these little strips. The pink ones have the leftover juice from the berry mixture. The juice was so delicious! For the other ones, I brushed them with cream and sprinkled with sugar.
 |
| brushed with juice or cream and sprinkled with sugar |
 |
| then baked...yum |
 |
| a good shot of how flaky the pie crust was |
Bye for now...