Showing posts with label bacon. Show all posts

Thursday, December 4, 2014

A Birthday/Lasagne Dinner Party: Roasted Portobello, Bacon & Kale Lasagne

I had a dinner party for my birthday a few months back and made two types of lasagne - one with a white sauce and one with a red sauce - Roasted Portobello, Bacon & Kale Lasagne and Two Sausage & Collard Greens Lasagne. I wanted something that would be prepped the day before and then baked up without too much effort the day of. It was my birthday, after all, and I didn't want to spend all day cooking. Lasagne is great too because you always get lots of leftovers!

hearty and delicious!

Here is my recipe for Roasted Portobello, Bacon & Kale Lasagne (adapted from this Bon Appetit recipe).

Ingredients
Filling:
3 T. and 2 T. olive oil
10-12 large portobello mushrooms, cleaned and stems removed
8-10 slices of thick cut bacon
4 large shallots, finely chopped
1 large bunch kale
2 t. finely chopped fresh rosemary
2 t. finely chopped fresh thyme
salt and pepper

White Sauce:
4 c. whole milk
16 oz. broth (chicken or vegetable)
1 bay leaf
8 T. butter
2/3 c. all-purpose flour
2 c. (approx. 8 oz.) shredded Gruyère cheese
1/3 c. shredded Parmigiano-Reggiano cheese
1/8 t. freshly grated nutmeg
salt and pepper

1 pound lasagne noodles, slightly under-cooked as they will finish cooking when you bake the lasagne
1/2 shredded Parmigiano-Reggiano cheese (to sprinkle over assembled lasagne)

Method
See below for the step-by-step:

Step 1, making the mushrooms. Preheat oven to 400 degrees. Toss cleaned and de-stemmed mushrooms in 3 T. olive oil (drizzle oil over mushroom caps and rub with your hands until the oil coats the mushrooms).

oil drizzled portobello mushroom caps, ready for baking

Place mushroom caps upside-down on two parchment paper covered sheet pans. Sprinkle with salt and pepper. Bake at 400 degrees for about 45 minutes or until tender.

done! These were so fragrant and delicious after baking.
I would definitely make these again and serve sliced or cubed over pasta or a salad
(or just as a meal with some crusty bread). Yum!

Slice each cap into thin strips (approx. 1/4 or 1/3 inch wide) and set aside. A serrated knife works well for this.

slice each cap into thin slices and set aside

Step 2, making the rest of the filling. While the mushrooms are roasting, make the bacon, kale, and shallot filling.

ingredients for the bacon-kale-shallot filling

Cut the bacon slices crosswise into small pieces (approx. 3/4 inch or so). Finely chop the shallots, and both the herbs. Set the herbs aside.

Wash the kale and cut it into a chiffonade (long strips). You can do this easily by laying several kale leaves on top of each other, then roll them into a round (lengthwise) and slice thinly.

leaves are rolled up and cut into thin strips

voila, a chiffonade of kale!

In a medium, heavy-bottomed pan, heat remaining 2 T. olive oil over medium-high heat. Add bacon and saute until crisp and browned. Add shallots and herbs. Cook for about 5 minutes, until shallots are tender. Lower heat, if necessary.

cooking down the bacon and shallots; rosemary and thyme are added

Add kale, stir well, cover and cook an additional 5 or so minutes until the kale softens. It doesn't have to be completely cooked as it will continue to cook in the lasagne.

doesn't this look amazing? Bacon, shallots, and kale? I could eat it just like this!

Remove this mixture from heat and set aside.


Step 3, making the sauce. Shred the cheeses and set aside; grate nutmeg and set aside.

ingredients for the white sauce

shredded Parmigiano-Reggiano and Gruyère cheeses

Add milk, broth, and bay leaf to a large heavy-bottomed saucepan and heat to a simmer. Remove the milk mixture from heat and set aside for 10 minutes, then remove bay leaf and discard.

In a separate large, heavy-bottomed pan or medium pot, create a roux by melting the butter over medium heat. When it begins to get bubbly and foamy, whisk in the flour (lower the temperature, if necessary so the butter doesn't burn). Whisk for about 2 minutes to remove the floury taste.

creating the roux

Whisk in about 1 cup of the hot milk mixture, whisk well (this will help avoid lumps), then add remaining hot milk mixture. Bring to a boil, then reduce heat to low. Simmer about 5 minutes, whisking frequently. You don't want the mixture to get too thick because it will continue to thicken after you add the cheeses.

Remove from heat and stir in the two cheeses and the grated nutmeg. Season with salt and pepper. Set the sauce aside.

the finished sauce

Step 4, boil the lasagne noodles. Cook the noodles as directed by the package, but cook for slightly less time than noted (they will continue to cook when you bake the lasagne). Boil your noodles gently, so they don't get ripped or shredded. Drain and rinse with cool water.

gently boiling my noodles

If not assembling the lasagne immediately, drizzle some olive oil over the noodles so they don't stick together and gently toss (or use your hand to swirl the noodles around) to make sure all noodles get some oil. Carefully lay out all noodles and make sure there is a bit of oil between each noodle, so they don't stick. I used a sheet pan (they fit perfectly!) lined with foil.

my cooked noodles, lightly oiled

fillings made, noodles boiled...I'm ready to assemble

Step 5, assembling the lasagne! If baking right away, preheat oven to 350 degrees. Lightly oil a 13x9 inch glass baking dish. Spoon approximately 1 cup of sauce into the baking dish and spread evenly over the bottom. Layer 3 noodles over the sauce, overlapping them slightly, if needed. Spread about 1 1/2 cups of sauce over noodles (use more if needed), then layer 1/3 of the sliced mushrooms over the noodles, then layer 1/3 of the bacon-kale-shallot mixture over the mushrooms.

layering the sauce and two fillings

Three more noodles go next, then about 1 1/2 cups sauce, then 1/3 of the mushrooms, then 1/3 of the bacon-kale-shallot mixture. Repeat with 3 noodles, about 1 1/2 cups sauce, then the remaining mushrooms and remaining bacon-kale-shallot mixture. Top with 3 more noodles and the remaining sauce.

At this point I wrapped my assembled lasagne and refrigerated it overnight.

my assembled lasagne goes into the fridge until the next day

When you are ready to bake the lasagne, sprinkle the 1/2 shredded Parmigiano-Reggiano cheese over the top of the sauce. Bake in a 350 degree oven for approximately 45 minutes (or 1 hour, if out of the fridge), until golden brown on top and the sauce is bubbling up. Let stand in a warm place for about 20 minutes before serving. Enjoy!

baked up hot and ready to enjoy!

Bye for now...
 

Friday, August 22, 2014

Apropos of Nothing: A Hearty Winter Breakfast

As the title says...this is apropos of nothing. I just thought this hearty breakfast from last winter looked so delicious that I wanted to share. It's a bit "do you want any breakfast with that bacon" but hey...it's bacon!

oh, yum!


Bye for now...
 

Thursday, March 15, 2012

Flakey Pie Crust...filled two ways

I love making pies - especially the crust. I always make my pie crusts by hand and I love the satisfaction when they come out perfectly flaky. I also love that you can fill a pie crust with so many different things - meat, veg, fruit, nuts, chocolate...savory or sweet, it's your choice!

Here are two pies I made recently with an all-butter crust - an onion, bacon and cheddar quiche and a blueberry pie. Both were scrumptious!

cutting in the cold butter by hand using my old trusty pastry cutter

keep going until the mixture is about the size of peas
(although you do want some variation in the size of the butter pieces)

add ice cold water, a few tablespoons at a time, and mix gently with a fork

It's okay that there is still some dry flour as you can see below. In my opinion it's better to be on the dry side rather than the wet side at this stage. The dry flour will be absorbed during the kneading and resting. If the dough is too wet you will end up adding more flour which will end up making your dough tough.

turned out onto my bench for kneading

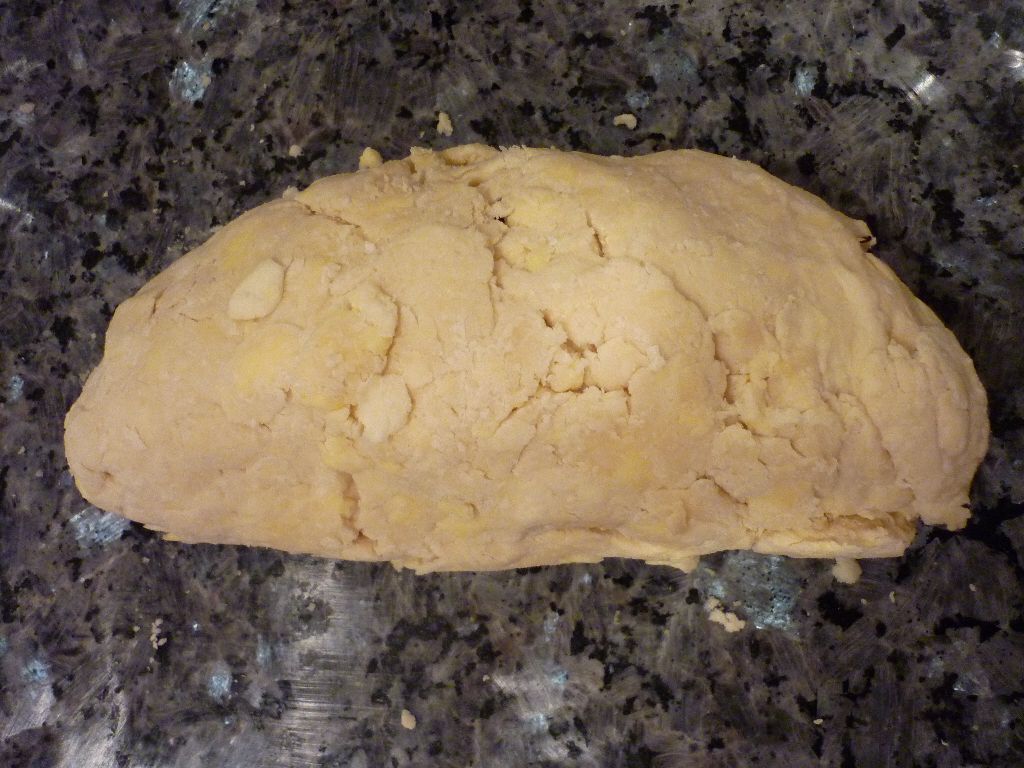
At this point, you want to knead the dough as little as possible as you form it into a solid mass. Once you add the water (or any liquid) to the flour, too much kneading will overwork the gluten in the flour which will make your dough tough. Over-kneading will also incorporate the butter into the dough more than you want, which will result in a less flaky dough. You want the little butter pieces to stay intact because this helps your crust flake when you bake it (the water in the butter turns into steam and creates separate layers in the finished crust).

So, always try to quit a bit before you think you should! I try to knead my pie (and scone) dough no more than 15-17 times. My granddaddy - the best baker in our family - says 17 times for his scone recipe but sometimes I can get away with 15.

stop as soon as the dough comes together
as you can see, all of the dry flour has now been incorporated

this recipe makes enough for two crusts

oh how I love making pie crusts - beautiful!

flatten each half into a round disk (will help you roll it out more easily)
and refrigerate for at least 30 minutes - an hour or two is better
the cold rest period both re-chills the butter rests the gluten

I like to roll my crusts ot between two pieces of wax paper. This way you need very little extra flour and it is much less likely to stick to the bench or your rolling pin. It also makes it easy to transfer to the pie plate. If using this method, after every few rolls, lift the wax paper off the dough (on both top and bottom). This will keep the dough from stretching and also from sticking to the wax paper. If you find the dough does start to stick, leave it in between the wax paper, slide it onto a sheet pan and pop it into the fridge for 15 minutes to re-chill the butter. Also remember to turn your rotate the dough a little after every roll or two so you can keep it as round as possible.

rolling out my dough

done!

Place your rolled out dough over the pie plate and gently lift and settle it into the corners of the pie plate. You don't want to stretch it here or it will just retreat when you bake it (as you can see my quiche crust did a little!). Trim the edge so you are left with about 1 inch of overhanging dough around the whole thing. Then, tuck the overhanging dough underneath so you are left with a nice thick edge. This will make it easier to crimp or flute.

tuck the overhanging dough underneath to form the edge

flute the edges (as I did for the blueberry pie)
or leave plain (as I did for the quiche)

After fitting the dough into the pie plates, put them back in the fridge for another period of chilling and relaxing. About 20 minutes should do it.

For the quiche filling, I followed Julia Child's base recipe for quiche. Simply put 3 eggs in a measuring cup and then fill to 1 1/2 cups with heavy cream or whole milk (or a combination of the two). Super easy, right?

Nutmeg goes really well with egg dishes so I also like to add a bit of freshly grated nutmeg to my quiche.

my eggs and milk mixture

I love onions - the more the merrier!

grated Irish cheddar went in first, then the caramelized onions, then the bacon
and finally the egg and milk mixture is poured over the top

baked to a golden brown
(about 55 minutes or until a knife inserted in the middle comes out clean)

delicious!


For the second pie I made blueberry. My mom and I had been experimenting with making a blueberry pie that would still have a nice bottom crust; we decided that using frozen blueberries - and not thawing them before you bake - was the best way to keep the bottom crust crispy. We mixed frozen blueberries, a bit of sugar, a bit of flour (to thicken the juices), lemon juice, lemon zest and a sprinkle of spices (cardamom, cinnamon and nutmeg). Dot the top with butter and you are done.

mix all the ingredients in a bowl...can't get much easier than that

pour into the crust and dot with butter

top with a scoop of vanilla ice cream and enjoy


Bye for now...

Thursday, September 8, 2011

Quick Lentil Stew and Focaccia

Last week a work colleague had a lentil salad for lunch - it looked delicious. So delicious that I wanted to try something similar myself. I bought some French lentils (I like them because they cook faster) and threw together a quick lentil stew and some focaccia this weekend.

The focaccia recipe I used was cobbled together from a Julia Child (Baking with Julia) recipe and one from a bread class at Cambridge School of Culinary Arts. The lentil stew recipe I made up on the fly, so I'll list it below. In terms of the ingredients I just threw together what I had around the kitchen and pantry. I called it a stew instead of a soup because I wanted it to be thick hearty rather than brothy but if you prefer more broth you can add more water or stock. I wanted to use stock but didn't have any and worried that the water would make for a bland stew, but it actually was very flavorful so I'm glad I went ahead and made it without waiting to use stock.

Quick & Easy Lentil Stew
Ingredients
French green lentils - I used about 3 cups worth (rinsed and picked over)
1 large onion, chopped (I used a huge vadalia, but I love onions, so use more/less as you like)
5 small carrots, chopped into bite sized pieces
3 cloves garlic, minced
1 can whole tomatoes, chopped
smoked thick cut Canadian bacon cut into bite sized pieces (any other meat you like would work...or no meat!)
olive oil
~5 cups water to cover lentils (more or less depending on how much lentils you use and/or how much broth you want)
salt & freshly ground pepper, to taste
2 bay leaves
~1/2 t oregano
I didn't think of it at the time but some hot sauce might be good to give it a little kick. Frank's Red Hot is my fav.

Directions
Heat olive oil in a large pot, add onions and carrots. Cover and cook for about 5-10 minutes - stirring occasionally - until the onions are translucent and carrots begin to soften. Add garlic, salt and pepper and stir.

Add the remaining ingredients (lentils, tomatoes, Canadian bacon, bay leaves, oregano, water) and give it a good stir. Cook for about 30 minutes - stirring occasionally and adding more water, if neccessary - until the sauce is thickened and the lentils are soft.

Enjoy with some focaccia, crusty french bread or some tortilla chips and a glass of red wine. I've been bringing leftovers to work this week and it's just as delicious!


the finished stew - onions and carrots and lentils, oh my!

into the bowl

yummy!

focaccia - brushed with olive oil and sprinkled with salt and chopped rosemary...
ready for baking

smells delicious


Bye for now...